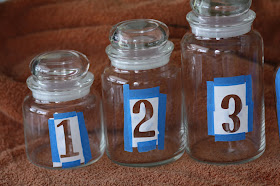
I got these jars at Goodwill a couple of weeks ago as I wanted to recreate this look from Pottery Barn.

First step is to wash the jars and dry them really well. Then create the stencil. This was very easy with the Cricut. I simply typed out the numbers and made sure to press FLIP. I used freezer paper and placed the shiny side down on the sticky mat. I used medium for both settings, and 2" for size.

Carefully peel the stencil off the mat- I wasn't careful enough and the three ripped a tad.

Place stencil on the jars with tape. I used painter's tape because we have some around the house since my husband is painting the living room, but you could use any type of tape.

Then using your preferred type of paint, color in the stencil. I used an acrylic paint in black. I tried to smudge the edges a bit on purpose to give it a more rustic look.
Proudly linking to:


They look amazing, pottery barn here she comes!!
ReplyDeleteTracey
Love it! I am a sucker for jars and numbers, now all I need is a Cricut ;)
ReplyDeletevisiting from take a look tuesday... great project. now i want a cricut!
ReplyDeleteI want a Cricut soooo badly! But as much as the Mr. spoils me, he draws the line at this lol. Can't say I blame him. These look great though! I like the simplicity of it.
ReplyDeleteCute! I receive a Silhouette for Mother's Day and am still waiting for an opportunity to use it. How exciting! Thank you so much for stopping by my blog!
ReplyDeleteLook'n good! Link it up to Mad Skills Monday! See ya!
ReplyDeleteGinger
SSB
Oh what a great DIY project. You are one clever and crafty girl.
ReplyDeleteI just finished a project that took 23 years to complete.
Come take a peek.
WOW! These are seriously fabulous. You have inspired me to spruce up my kitchen canisters. Don't you just love your new cricut?! Ahhh good times :)
ReplyDeleteOh wow I would love to have a Cricut! Lucky! Those are really cute!
ReplyDeleteThese jars are so cute. I love the beans, they make really cute decorations. Thanks for sharing this great tutorial!
ReplyDeleteI love these jars! And when I saw that you made them using the Cricut, well I am so there. Thanks for sharing a great tutorial.
ReplyDeleteThese are really cute! I love anything numbered.
ReplyDeleteI love my cricut, too. I've never even noticed the flip button! Thanks!