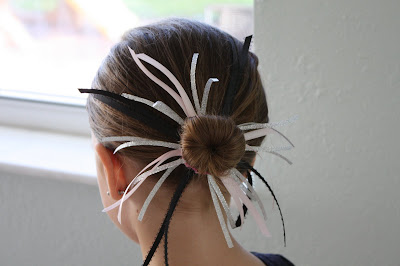
This is a tutorial that I did as a guest post on another blog, but I wanted to share it here in case anyone missed it. It's for a sunburst pony-o which I made for my daughter to wear to ballet class. She needs to wear pink & black this year, so I thought the colors would work well. It's very easy to make and much cheaper than the $15 clips they sell at the dance store.

This was the inspiration piece which I picked up for 25cents last year in a post-Halloween sale. I love the variation of widths and colors used and tried to replicate it somewhat.
You will need: 3 different colors of ribbon in different widths and textures, matching thread, Fray Check or lighter, scissors, sewing needle, and pony-o.
Choose the first ribbon and cut four 7.5 inch strips.
Treat the ends of the ribbon either with Fray Check or with a lighter.
Fold each length in half and sew on to the pony-o with matching thread.
This is what it looks like once all four have been attached.
Choose the next ribbon and cut four 8.5 inch strips. Treat the ends and attach in the same manner as the previous set.
And lastly cut eight 6 inch strips of the last ribbon. Follow the same directions as above.
And ta-da, here is your sunburst pony-O! I chose a small rubber band because my daughter has very fine hair. I only want to loop it around her bun once so that the ribbon can lay nicely around it. If I had chosen a bigger rubber band I would need to double it up and the ribbon wouldn't look as pretty.
Proudly linking to:


8 comments:
Super cute! I'm going to try this for my friend's daughter. Thanks for the tutorial!
That's pretty cool! I love how it looks! Thanks for linking up to Making Your Home Sing Monday.
That is precious!! My daughters would enjoy having something like that, especially since the colors can be customized.
That is so cute! Thanks for a great idea.
My daughter would love this! So cute!
so cute! Nice tutorial!
I am having a giveaway on my blog. $40 store credit from o&el(etsy) to get a kids drawstring backpack perfect for summer camps or a trip/spring hair accessories.All you have to do is leave a comment.
check it out.
http://houseonashwelllane.blogspot.com/2011/03/40-store-credit-free-shipping-from-o-to.html
Cute hair ties. I love the step by step pictures, you made it so easy to replicate. Thanks for sharing!
hiya , great idea and tutorial , tfs , i am visiting from someday crafts and am your newest follower maybe you will pop by mine and follow too
www.emilysnan.blogspot.com
xmaggiex
Post a Comment