Thursday, March 8, 2012

BlogHer Book Club: Diary of a Mad Fat Girl

This book was a pleasure to read and to review for the BlogHer Book Club. Stephanie McAfee created a set of characters that anyone would want to hang out with on a Saturday night. Ace is the friend everyone needs to have in their circle of friends and she proves it when she helps her two best friends dig themselves out of troublesome situations. The book deals with many different topics including emotional abuse in a marriage. The author finds humor in the situation while still dealing with a complex topic that is not always easy to read about in a book.

Having said that, this is the type of book that one would take to the beach or on a plane. It's not a "deep" book by any means but it's certainly entertaining. I enjoyed getting to know the characters and following the different story lines. I was a tad annoyed with Ace's reaction to her ex and felt that part of the story could have been dealt in a more mature way but other than that the characters were all people I wanted to get to know better. And Ace's chiweenie Buster Loo just adds to the spark of the story!

This book and the main character reminded me of Stephanie Plum in the series by Janet Evanovich. I hope the self-publishing fairy tale doesn't end here and instead McAfee continues to write books about Ace!

Please join me at the BlogHer Book Club page HERE for more discussions about this book.

This was a paid review for BlogHer Book Club but the opinions expressed are my own.

Monday, March 5, 2012

Truffula Tree DIY Thank You Cards

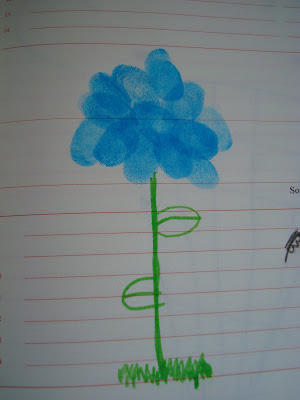
My children are obsessed with The Lorax book. My mom gave my daughter an old planner that my daughter cherishes. She is always making pictures and writing stories in it. A couple of days ago she made a really cute picture and when I asked her what it was she told me it was a Truffula tress like those in Dr. Seuss' book The Lorax. I absolutely loved it and decided to make some thank you cards using that design.

We gathered up the following supplies:
- inspiration book "The Lorax" by Dr. Seuss (on hand)
- pack of 50 blank cards with envelopes ($3)
- rainbow ink pad ($2)

We laid out all the supplies, including the inspiration drawing, and got to work.

The process is as simple as dipping your finger in ink and then "stamping it" on the front of the card. I let each kid create their own tree.

Here is the first Truffula Tree.

Then a trunk was added.

And then some green polka dots and a rainbow thank you at the top! Card completed!

This is another one my daughter created and she even added a Lorax to it!

And this is my 3 year old son's version of The Lorax with a Truffula Tree. We ended up making about 10 thank you cards for $6 and we still have 40 blank cards and an ink pad to use!

Proudly linking to:

Tip Junkie handmade projectsGet Your Craft On Tuesday I'm topsy turvy tuesdays
abc button
Nap-Time CreationsPhotobucket
Creations by KaraPassionately Artistichttp://www.thethriftyhome.com

Our Delightful Home

giveaways Katie's Nesting Spot


Wednesday, February 29, 2012

Homemade Granola


My daughter loves granola and eats it with fruit and yogurt every morning. A couple of weeks ago my husband suggested I try making it. He thought I would enjoy the challenge and the savings! However the bonus for me was knowing exactly what went into something my family eats every day. I love to play around with recipes so I found one I liked and got started. Whenever I adjust recipes I usually only change one thing at a time. So for the first run on this recipe I substituted the vegetable oil with coconut oil. I have completely eliminated vegetable oil from our diet so it was an obvious choice. This is the adapted recipe after one try, my changes in red:

Granola
Recipe courtesy of Alton Brown

Ingredients:

  • 3 cups rolled oats
  • 1 cup slivered almonds
  • 1 cup cashews
  • 3/4 cup shredded sweet coconut
  • 1/4 cup plus 2 tablespoons dark brown sugar
  • 1/4 cup plus 2 tablespoons maple syrup
  • 1/4 cup vegetable oil -- substituted with 1/4 cup coconut oil
  • 3/4 teaspoon salt
  • 1 cup raisins
Directions
Preheat oven to 250 degrees F. In a large bowl, combine the oats, nuts, coconut, and brown sugar. In a separate bowl, combine maple syrup, oil and salt. Combine both mixtures and pour onto 2 sheet pans. Cook for 1 hour and 15 minutes, stirring every 15 minutes to achieve an even color. -- baked for an extra 20 minutes to ahcieve a deeper color & crunch

Remove from oven and transfer into a large bowl. Add raisins and mix until evenly distributed.


We really liked it but found it a bit sweet so here are some planned changes for future batches:

- switch out the maple syrup with agave nectar. This
link talks about using agave nectar in recipes.
- decrease the brown sugar
- substitute shredded coconut with unsweetened variety

What I just described is the process I use to adapt a recipe to our tastes. I believe in feeding my family as well as possible and one way I achieve this is by making the things we like as healthy as possible without compromising the flavor.

Thank you for stopping by! I hope you'll try this recipe, let me know what you think!

Proudly linking to:

Creations by Kara Passionately Artistichttp://www.thethriftyhome.com
giveaways Katie's Nesting Spot

Photobucket
Bubbly Nature